sexta-feira, 28 de abril de 2017

configurando BOINC projeto SETI@HOME

https://www.digitalocean.com/community/tutorials/how-to-set-up-seti-home-on-ubuntu-14-04-or-debian-7

How To Set Up SETI@home on Ubuntu 14.04 or Debian 7

PostedMarch 11, 2015 25.1kviews MISCELLANEOUS

Introduction

SETI@home is a large volunteer distributed computing project where software running on participant systems is used to analyze space telescope radio data in order to identify signals or signs of intelligent life. SETI@home uses software known as BOINC which is available on many platforms including Linux.
BOINC has a graphical application but also works via the command line. This makes running SETI@home on a Droplet or another headless server very feasible. SETI@home requires very little disk space for usage — typically, 100MB of space is sufficient — but can utilize as much CPU as it's given.

Prerequisites

  • An Ubuntu 14.04 or Debian 7 Droplet, any size.
  • A sudo non-root user. You can follow the first four steps of this tutorial for setup on Ubuntu, and this tutorial for Debian.

Step One — Install boinc-client

SETI@home operates via the BOINC client which is available in the standard Debian and Ubuntu repositories.
sudo apt-get install boinc-client

Step Two — Connect to a SETI@home Account

With SETI@home, you'll earn SETI credit for work completed. To connect this host to a SETI@home account and receive credit, an account key is needed.
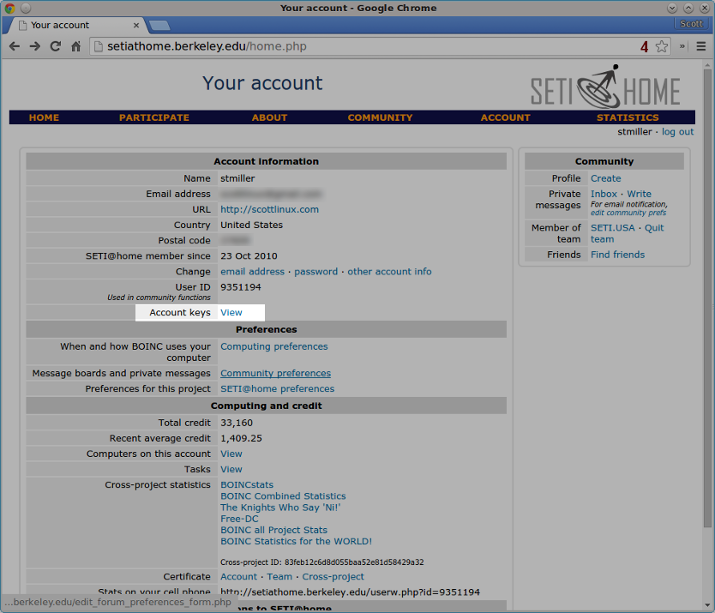
First, create a SETI@home account or log in to your existing SETI@home account. Once inside, click View next to Account keys.
Account Keys
You'll see your SETI@home account key on the top of the next page. Run the following command with your account key:
boinccmd --project_attach http://setiathome.berkeley.edu account_key
At this point, boinc will begin crunching away with default values.
For now, stop the boinc-client service so CPU usage preferences can be set.
sudo service boinc-client stop

Step Three — Configure Host CPU Usage Preferences

By default, the BOINC client will use 100% of available CPU. In this step, we will configure the host to use less CPU.
Note: In a cloud hosting environment, you are required to lower your CPU utilization from 100% to avoid excessive high usage, which might affect neighboring Droplets.
Local host preferences are set in the file /var/lib/boinc client/global_prefs_override.xml, which will be empty initially. An example file is given below for this guide, which is the recommended configuration for a Droplet.
Edit the file /var/lib/boinc-client/global_prefs_override.xml.
sudo nano /var/lib/boinc-client/global_prefs_override.xml
You will see an some existing text that looks like this:


Delete that, and paste in this example file.

   0
   1
   0
   50.000000
   0.000000
   0.000000
   0.000000
   0.000000
   0
   1
   0
   0
   0.100000
   0.500000
   100.000000
   60.000000
   60.000000
   10.000000
   90.000000
   1.500000
   75.000000
   50.000000
   90.000000
   0.000000
   0.000000
  25.000000
   0.000000
   0

Next we will inspect two settings in this example file concerning CPU, which are highlighted above.
The first preference is cpu_usage_limit, which is used to limit the amount of CPU used by SETI@home. The example file uses a setting of 25.000000, meaning CPU usage is limited to 25% max. 25.000000 is a good setting if your machine is dedicated for another task or service but contribution to SETI@home is still desired.
The second preference is suspend_cpu_usage which is used to temporarily suspend SETI@home from operation when CPU usage by other application reaches that level. In the example file, suspendcpuusage is set to 50.000000, or 50%.
You can read more about BOINC preferences on their wiki.
After saving and closing the file, start the boinc-client. This will allow SETI@home to start performing work.
sudo service boinc-client start

Step Four — Verify the Newly Added Host

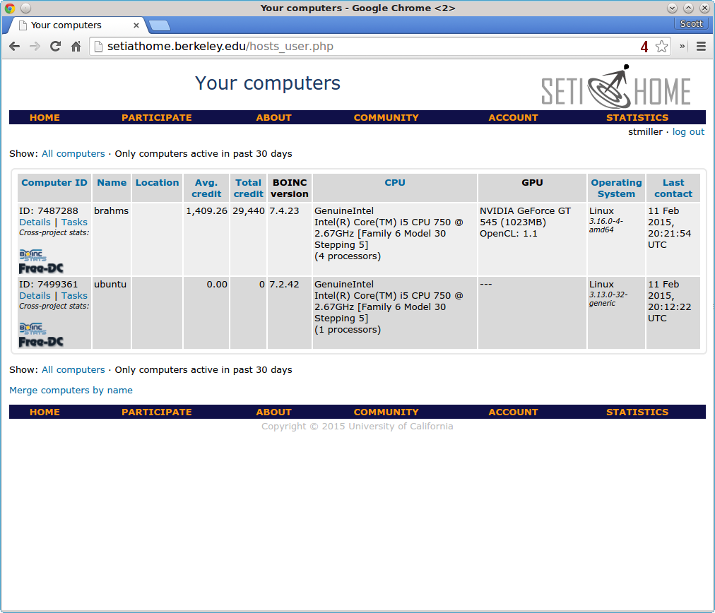
After about five minutes, the new host should appear online. Connected computers can be viewed inside the SETI@home account page.
Connected Computers

Step Five — Check the Status of Work Units

To view the status of work units or tasks, use the command:
boinccmd --get_simple_gui_info
Note that this displays your general SETI@home account information followed by current executing tasks on this specific host.
Below is example output for --getsimplegui_info:
boinccmd --get_simple_gui_info
======== Projects ========
1) -----------
   name: SETI@home
   master URL: http://setiathome.berkeley.edu/
   user_name: stmiller
   team_name: SETI.USA
   resource share: 100.000000
   user_total_credit: 33159.675770
   user_expavg_credit: 1409.252845
   host_total_credit: 0.000000
   host_expavg_credit: 0.000000
   nrpc_failures: 0
   master_fetch_failures: 0
   master fetch pending: no
   scheduler RPC pending: no
   trickle upload pending: no
   attached via Account Manager: no
   ended: no
   suspended via GUI: no
   don't request more work: no
   disk usage: 0.000000
   last RPC: 1423684749.199424
   project files downloaded: 0.000000
GUI URL:
   name: Message boards
   description: Correspond with other users on the SETI@home message boards
   URL: http://setiathome.berkeley.edu/forum_index.php
GUI URL:
   name: Help
   description: Ask questions and report problems
   URL: http://setiathome.berkeley.edu/forum_help_desk.php
GUI URL:
   name: Your account
   description: View your account information
   URL: http://setiathome.berkeley.edu/home.php
GUI URL:
   name: Your preferences
   description: View and modify your computing preferences
   URL: http://setiathome.berkeley.edu/prefs.php?subset=global
GUI URL:
   name: Your results
   description: View your last week (or more) of computational results and work
   URL: http://setiathome.berkeley.edu/results.php?userid=9351194
GUI URL:
   name: Your computers
   description: View a listing of all the computers on which you are running SETI@Home
   URL: http://setiathome.berkeley.edu/hosts_user.php?userid=9351194
GUI URL:
   name: Your team
   description: View information about your team: SETI.USA
   URL: http://setiathome.berkeley.edu/team_display.php?teamid=115396
GUI URL:
   name: Donate
   description: Donate to SETI@home
   URL: http://setiathome.berkeley.edu/sah_donate.php

======== Tasks ========
1) -----------
   name: 25fe12ab.24545.17667.438086664204.12.226_0
   WU name: 25fe12ab.24545.17667.438086664204.12.226
   project URL: http://setiathome.berkeley.edu/
   report deadline: Wed Mar  4 02:06:18 2015
   ready to report: no
   got server ack: no
   final CPU time: 0.000000
   state: downloaded
   scheduler state: scheduled
   exit_status: 0
   signal: 0
   suspended via GUI: no
   active_task_state: EXECUTING
   app version num: 701
   checkpoint CPU time: 352.733700
   current CPU time: 378.866400
   fraction done: 0.088431
   swap size: 110309376.000000
   working set size: 40030207.999996
   estimated CPU time remaining: 2505.901220
The status of SETI@home credit can also be viewed inside your account page under Computing and credit.

Conclusion

The SETI@home forum is the best place for news and questions about running SETI@home.
To join a team, view the team page!

quinta-feira, 13 de abril de 2017

RKHUNTER - detecta trojans, rootkits, ...

https://www.linuxdescomplicado.com.br/2015/09/30-ferramentas-que-todo-sysadmin-linux-deve-conhecer.html


12 – RKHUNTER

O RKhunter é uma excelente ferramenta para detectar trojans, rootkits e outros possíveis problemas de segurança em servidores linux. A máquina de origem deverá possuir o recurso RKHUNTER instalado, caso não possua, basta instalá-lo conforme sua distro Linux.
http://rkhunter.sourceforge.net/

Obs: Sempre que instalar novos programas faça uma atualização do banco de dados do rkhunter:

# rkhunter --propupd

Exemplo:
$ rkhunter -c

NETHOGS - medir consumo banda

https://www.linuxdescomplicado.com.br/2015/09/30-ferramentas-que-todo-sysadmin-linux-deve-conhecer.html


FERRAMENTAS DE MONITORAMENTO

28 – NETHOGS

Nethogs é uma ferramenta de linha de comando do tipo “top” para medir o consumo de banda. É uma ferramenta que mostra a largura de banda utilizada por processos individualmente e os classifica listando os mais usados (tráfego maior de dados). No caso de um pico na largura de banda, o nethogs detecta o processo responsável e identifica o PID, o usuário e o caminho do programa. A máquina de origem deverá possuir o recurso NETHOGS instalado, caso não possua, basta instalá-lo conforme sua distro Linux.
Exemplo:
$ nethogs

Lynis Auditoria Servidor Linux

http://www.100security.com.br/lynis/

Lynis – Ferramenta de Auditoria e Hardening

Lynis é uma excelente ferramenta de Auditoria e Hardening para Linux, Unix e etc… possui um relatório bem detalhado e certamente vai auxiliar no processo de implantação de boas prática em um servidor.
Site Oficial: cisofy.com
01 Passo
Realize o download do lynis
root@kali:/# git clone https://github.com/CISOfy/lynis
lynis01
02 Passo
Entre no diretório do lynis e liste os arquivos.
root@kali:/# cd lynis/
root@kali:/lynis# ls
lynis02
03 Passo
Execute o lynis para visualizar todos os parâmetros que ele disponibiliza.
root@kali:/lynis# ./lynis
lynis03

lynis04
04 Passo
Execute o lynis para auditar todo o sistema.
root@kali:/lynis# ./lynis audit system –auditor “100SECURITY” –Q
audit system : Audita todo o sistema
–auditor “100SECURITY” : Define o nome do Auditor
-Q (–quick) : Não aguarda a interação do Auditor
lynis05
lynis06
05 Passo
São gerados 02 arquivos de log, acesse o diretório /var/www e realize o download da ferramenta lynis-relatorios para ler o relatório gerado.
– Teste e detalhamento: /var/log/lynis.log
– Relatório: /var/log/lynis-repot.dat
root@kali:/lynis# cd /var/www/
root@kali:/var/www# git clone https://github.com/100security/lynis-relatorios
lynis07
06 Passo
Entre no diretório e liste os arquivos.
root@kali:/var/www# cd lynis-relatorios/
root@kali:/var/www/lynis-relatorios#
lynis08
07 Passo
Execute o script arquivos.sh para copiar os arquivos gerados pela ferramenta Lynis
root@kali:/var/www/lynis-relatorios# ./arquivos.sh
root@kali:/var/www/lynis-relatorios# ls -l
lynis09
08 Passo
Abra o navegador e acesse: http://localhost/lynis-relatorios/lynis-relatorios.php

configuracao basica iptables servidor linux

https://www.vivaolinux.com.br/dica/Configuracao-basica-do-IPtables

CONFIGURAÇÃO BÁSICA DO IPTABLES


Segue abaixo, uma sugestão de configuração básica para o IPtables

É somente um cabeçalho com regras iniciais, sendo que você pode adaptá-las livremente, acrescentar suas próprias regras, comentar o que não precisa, etc. 

#!/bin/bash
#
#Desabilitando o tráfego entre as placas
#################################

echo 0 > /proc/sys/net/ipv4/ip_forward
#
##Apagando e restaurando as chains e tabelas
######################################

iptables -Z  # Zera as regras de todas as chains
iptables -F  # Remove as regras de todas as chains
iptables -X  # Apaga todas as chains
#iptables -t nat -Z
#iptables -t nat -F
#iptables -t nat -X
#iptables -t mangle -Z
#iptables -t mangle -F
#iptables -t mangle -X
#
##Proteção contra ping, SYN Cookies, IP Spoofing e proteções do kernel
##########################################################

echo 1 > /proc/sys/net/ipv4/tcp_syncookies          # Syn Flood (DoS)
echo 1 > /proc/sys/net/ipv4/icmp_echo_ignore_broadcasts  # Port scanners
echo 0 > /proc/sys/net/ipv4/icmp_ignore_bogus_error_responses      # Sem resposta remota
for i in  /proc/sys/net/ipv4/conf/*; do
echo 0 > $i/accept_redirects                # Sem redirecionar rotas
echo 0 > $i/accept_source_route            # Sem traceroute
echo 1 > $i/log_martians                # Loga pacotes suspeitos no kernel
echo 1 > $i/rp_filter                  # Ip Spoofing
echo 1 > $i/secure_redirects; done                      # Redirecionamento seguro de pacotes
echo 1 > /proc/sys/net/ipv4/icmp_echo_ignore_all        # Sem ping e tracert
#
# Carregando os módulos - Não é necessário todos os módulos,
# somente aqueles que você irá utilizar.
# O iptables, por padrão, carrega os módulos principais automaticamente.
# Para identificar qual módulo adicional carregar, você deve elaborar todo o script
# e depois de acordo com o nome do alvo utilizado, você carrega o mesmo módulo.
# Por exemplo, se você utilizar a seguinte regra:
# iptables -A FORWARD -p udp -m multiport --dport 80,1024:65535 -j DROP
# o módulo "ipt_multiport" deve ser carregado.
# Abaixo estão quase todos os módulos.
################################

modprobe ip_tables
modprobe iptable_nat
modprobe iptable_filter
modprobe iptable_mangle
#
modprobe ip_conntrack
modprobe ip_conntrack_ftp
modprobe ip_nat_ftp
modprobe ip_queue
modprobe ip_gre
#
modprobe ipt_LOG
modprobe ipt_MARK
modprobe ipt_REDIRECT
modprobe ipt_REJECT
modprobe ipt_MASQUERADE
modprobe ipt_TCPMSS
modprobe ipt_TOS
modprobe ipt_NETMAP
#
modprobe ipt_limit
modprobe ipt_mac
modprobe ipt_multiport
modprobe ipt_owner
modprobe ipt_state
modprobe ipt_tos
modprobe ipt_mark
modprobe ipt_tcpmss
modprobe ipt_string
modprobe ipt_statistic
#
modprobe nf_nat_pptp
modprobe nf_nat_proto_gre
#
# Definindo políticas padrões
######################

iptables  -P  INPUT DROP  # iptables a política padrão da chain INPUT é proibir tudo
iptables  -P  FORWARD DROP
iptables  -P  OUTPUT ACCEPT
#
# Liberando a Loopback
####################

iptables -A  INPUT -i lo -j ACCEPT
#
## Regras de segurança na internet e acessos
#####################################

iptables -A INPUT -m state --state ESTABLISHED,RELATED -j ACCEPT
iptables -A FORWARD -m state --state ESTABLISHED,RELATED -j ACCEPT
iptables -A INPUT -m state --state NEW !  -i  ethx -j DROP    # Interface de entrada da internet
iptables -A FORWARD -m state --state NEW ! -i ethx -j DROP    # Interface de entrada da internet
iptables -A INPUT -m state --state INVALID -j DROP
iptables -A FORWARD -m state --state INVALID -j DROP
#
# Redirecionamento para o Squid e mascaramento/compartilhamento
###########################################

iptables -t nat -A PREROUTING -i ethx -p tcp --dport 80 -j REDIRECT --to-port 3128  # Interface da rede interna
iptables -t nat -A POSTROUTING -o ethx -j MASQUERADE  # Interface de entrada da internet
#
# A partir daqui você pode inserir as regras de liberação e bloqueio, não esqueça habilitar no final o tráfego entre as placas.
#
# Habilitando o tráfego entre as placas
##########################

echo 1 > /proc/sys/net/ipv4/ip_forward
#

Depois de criar o script (com o nome de, por exemplo, firewall.sh), lembre de dar permissão de execução: 

# chmod +x /caminho/do/script/firewall.sh 

Exemplos:
  • No Debian é em: /ect/init.d/firewall.sh
  • No Slackware é em: /etc/rc.d/init.d/firewall.sh
  • No Red Hat é em: /etc/rc.d/init.d/firewall.sh
  • No openSuse é em: /ect/init.d/firewall.sh

O nome do script, aconselho a não colocar firewall.sh, pois é muito óbvio, coloque outro nome de sua escolha. 

Aqui tem uma regra simples, feita pelo próprio Rusty Russel, à qual você pode acrescentar para dar maior segurança na sua rede interna: 

## Carregando módulos de acompanhamento de conexões (desnecessário se compilados diretamente no kernel).
     insmod ip_conntrack
     insmod ip_conntrack_ftp

## Cria chain que rejeita novas conexões, exceto as vindas da rede interna.
     iptables -N block
     iptables -A block -m state --state ESTABLISHED,RELATED -j ACCEPT
     iptables -A block -m state --state NEW -i ! ppp0 -j ACCEPT  # em ppp0 coloque a sua interface de entrada da internet
     iptables -A block -j DROP

     ## Saltar das chains INPUT e FORWARD para a chain block.
     iptables -A INPUT -j block
     iptables -A FORWARD -j block

Retirado deste documento feito pelo próprio:
Conclusão: Estude o IPtables. Estude o IPtables. Estude o IPtables...